React 入门:从 MV* 到组件化 React 是一个声明式的 JavaScript 库,用于构建用户界面。它的核心公式很简单:UI = render(data) ——数据单向流动,你描述 UI 应该长什么样,React 负责把它渲染出来。
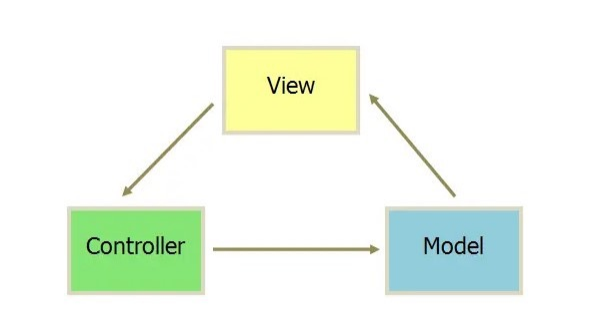
但在理解 React 之前,有必要先搞清楚它试图解决什么问题。我们来从 MVC 和 MVVM 这两种经典模式说起。
从 MVC 到 MVVM 1 2 3 4 5 6 7 8 9 10 11 12 13 14 15 16 17 18 19 20 21 22 23 24 25 26 27 28 29 30 31 32 33 34 35 36 37 38 39 40 41 42 43 44 45 46 47 48 49 50 51 52 53 54 55 56 57 58 59 60 61 62 63 64 65 66 67 68 69 70 71 72 73 74 75 76 77 78 79 80 81 82 var myapp = {} myapp.Model = function ( var val = 0 this .add = function (v ) { if (val < 100 ) val += v } this .sub = function (v ) { if (val > 0 ) val -= v } this .getVal = function ( return val } var self = this var views = [] this .register = function (view ) { views.push (view) } this .notify = function ( for (var i = 0 ; i < views.length ; i++) { views[i].render (self) } } } myapp.View = function (controller ) { var $num = document .getElementById ('num' ) var $incBtn = document .getElementById ('increase' ) var $decBtn = document .getElementById ('decrease' ) this .render = function (model ) { $num.innerText = model.getVal () + 'rmb' } $incBtn.addEventListener ('click' , controller.increase ) $decBtn.addEventListener ('click' , controller.decrease ) } myapp.Controller = function ( var model = null , view = null this .init = function ( model = new myapp.Model () view = new myapp.View (this ) model.register (view) model.notify () } this .increase = function ( model.add (1 ) model.notify () } this .decrease = function ( model.sub (1 ) model.notify () } } (function ( var controller = new myapp.Controller () controller.init () }())
MVVM(Model-View-ViewModel)在 MVC 基础上引入了数据绑定——ViewModel 层自动同步 Model 和 View 的状态,开发者不需要手动操作 DOM。Vue 和 Angular 都走的这条路。
React 选的是另一条路:不管 MVC 还是 MVVM,它只专注 View 层。数据变化时,React 重新计算整个 UI 的描述(VDOM),然后通过 diff 算法找出最小变更,只更新必要的 DOM 节点。这就是”声明式”的含义——你描述结果,框架处理过程。
JSX 模版语法 JSX 是 JavaScript 的语法扩展,让你在 JS 中直接写类似 HTML 的标记。因为本质上是 JS,所以使用 camelCase 命名属性(className 而不是 class,tabIndex 而不是 tabindex)。
JSX 里的 {} 中可以放任何 JS 表达式:
1 2 3 4 5 6 7 8 9 10 11 12 13 14 15 16 17 18 19 20 21 22 23 24 25 26 27 const name = 'Josh Perez' const element = <h1 > Hello, {name}</h1 > function formatNmae (user ) { return user.firstName + ' ' + user.lastName } const user = { firstName : 'Harper' , lastName : 'Perez' } const element = ( <h1 > Hello, {formatNmae(user)}! </h1 > ) function getGreeting (user ) { if (user) { return <h1 > Hello, {formatNmae(user)}!</h1 > } return <h1 > Hello, Stranger.</h1 > }
JSX 指定属性 1 const element = <img src ={user.avatarUrl} > </img >
JSX 最终会被 Babel 编译为 React.createElement 调用:
1
2
3
4
5
6
7
8
9
10
11
12
13
14
15
16
17
18
19
const element = ( <h1 className ="greeting" > Hello, world! </h1 > ) const element = React .createElement ( 'h1' , {className : 'greeting' }, 'Hello, world!' ) const element = { type : 'h1' , props : { className : 'greeting' , children : 'Hello, world!' } }
JSX 可以当做语法糖体验,在 babel repl 可以看到编译结果。实际项目中使用 @babel/preset-react:
1 2 3 4 5 6 7 8 9 10 11 12 13 14 15 16 17 18 const element = <h1 > Hello, world</h1 > ReactDOM .render (element, document .getElementById ('root' ))function tick ( const element = ( <div > <h1 > Hello, world</h1 > <h2 > It is {new Date().toLocaleTimeString()}.</h2 > </div > ) ReactDOM .render (element, document .getElementById ('root' )) } setInterval (tick, 1000 )
JSX 转 JS JSX 可以当做语法糖,可以在 babel 官⽹中尝试,https://babeljs.io/repl 可以使⽤官⽹提供的 create-react-app npm run eject 来看 babelrc 中的配置,主要使⽤https://www.babeljs.cn/docs/babel-preset-react
1
2
# 安装 babel 及 react 的依赖 npm install core-js @babel/core @babel/preset-env @babel/preset-react @babel/regiser babel-loader @babel/plugin-transform-runtime --sabe-dev
.babelrc
1
2
3
4
5
6
7
8
9
10
{ "presets" : [ "@babel/preset-env" , "@babel/preset-es2015" , "@babel/preset-react" ] , "plugins" : [ "@babel/plugin-transform-runtime" ] }
组件、Props 与 State React 组件在概念上等同于 JavaScript 函数——接受输入(props),返回 React 元素。
函数组件与 Class 组件 1 2 3 4 5 6 7 8 9 function Welcome (props ) { return <h1 > Hello, {props.name}</h1 > } class Welcome extends React.Component { render ( return <h1 > Hello, {this.props.name}</h1 > } }
渲染组件 1 2 3 4 5 6 7 8 9 function Welcome (props ) { return <h1 > Hello, {props.name}</h1 > } const element = <Welcome name ="Sara" /> ReactDOM .render ( element, document .getElementById ('root' ) )
Props:只读的输入 所有 React 组件都必须像纯函数一样保护它们的 props 不被更改。传入的 props 是只读的。
State:组件的内存 State 让组件拥有自己的数据。和 props 不同,state 完全由组件自己控制。
下面是一个时钟的例子——对比用 props 驱动(需要外部反复调用 ReactDOM.render)和用 state 驱动(组件自己管理时间更新):
1 2 3 4 5 6 7 8 9 10 11 12 13 14 15 16 17 18 19 20 21 22 23 24 25 26 27 28 29 30 31 32 33 34 35 36 37 38 39 40 41 42 43 44 45 46 47 48 49 50 51 52 53 54 55 56 57 58 59 function Clock (props ) { return ( <div > <h1 > Hello, world!</h1 > <h2 > It is {props.date.toLocaleTimeString()}.</h2 > </div > ); } function tick ( ReactDOM .render ( <Clock date ={new Date ()} /> document .getElementById ('root' ) ); } setInterval (tick, 1000 );class Clock extends React.Component { constructor (props ) { super (props); this .state = {date : new Date ()}; } componentDidMount ( this .timerID = setInterval ( () => this .tick (), 1000 ); } componentWillUnmount ( clearInterval (this .timerID ); } tick ( this .setState ({ date : new Date () }); } render ( return ( <div > <h1 > Hello, world!</h1 > <h2 > It is {this.state.date.toLocaleTimeString()}.</h2 > </div > ); } } ReactDOM .render ( <Clock /> document .getElementById ('root' ) );
关于 setState 的几个关键行为 :
构造函数是唯一可以直接给 this.state 赋值的地方,其他时候必须用 setState
setState 的更新可能是异步的——React 会批量合并多个 setState 调用来优化性能。因此不要依赖 this.state 的当前值来计算下一个状态,改用函数式写法:
1 2 3 4 this .setState ({ counter : this .state .counter + this .props .increment });this .setState ((state, props ) => ({ counter : state.counter + props.increment }));
State 更新是浅合并的——只更新你传入的字段,其他字段保持不变
数据向下流动:state 只在当前组件内生效,每个组件实例的 state 是独立的
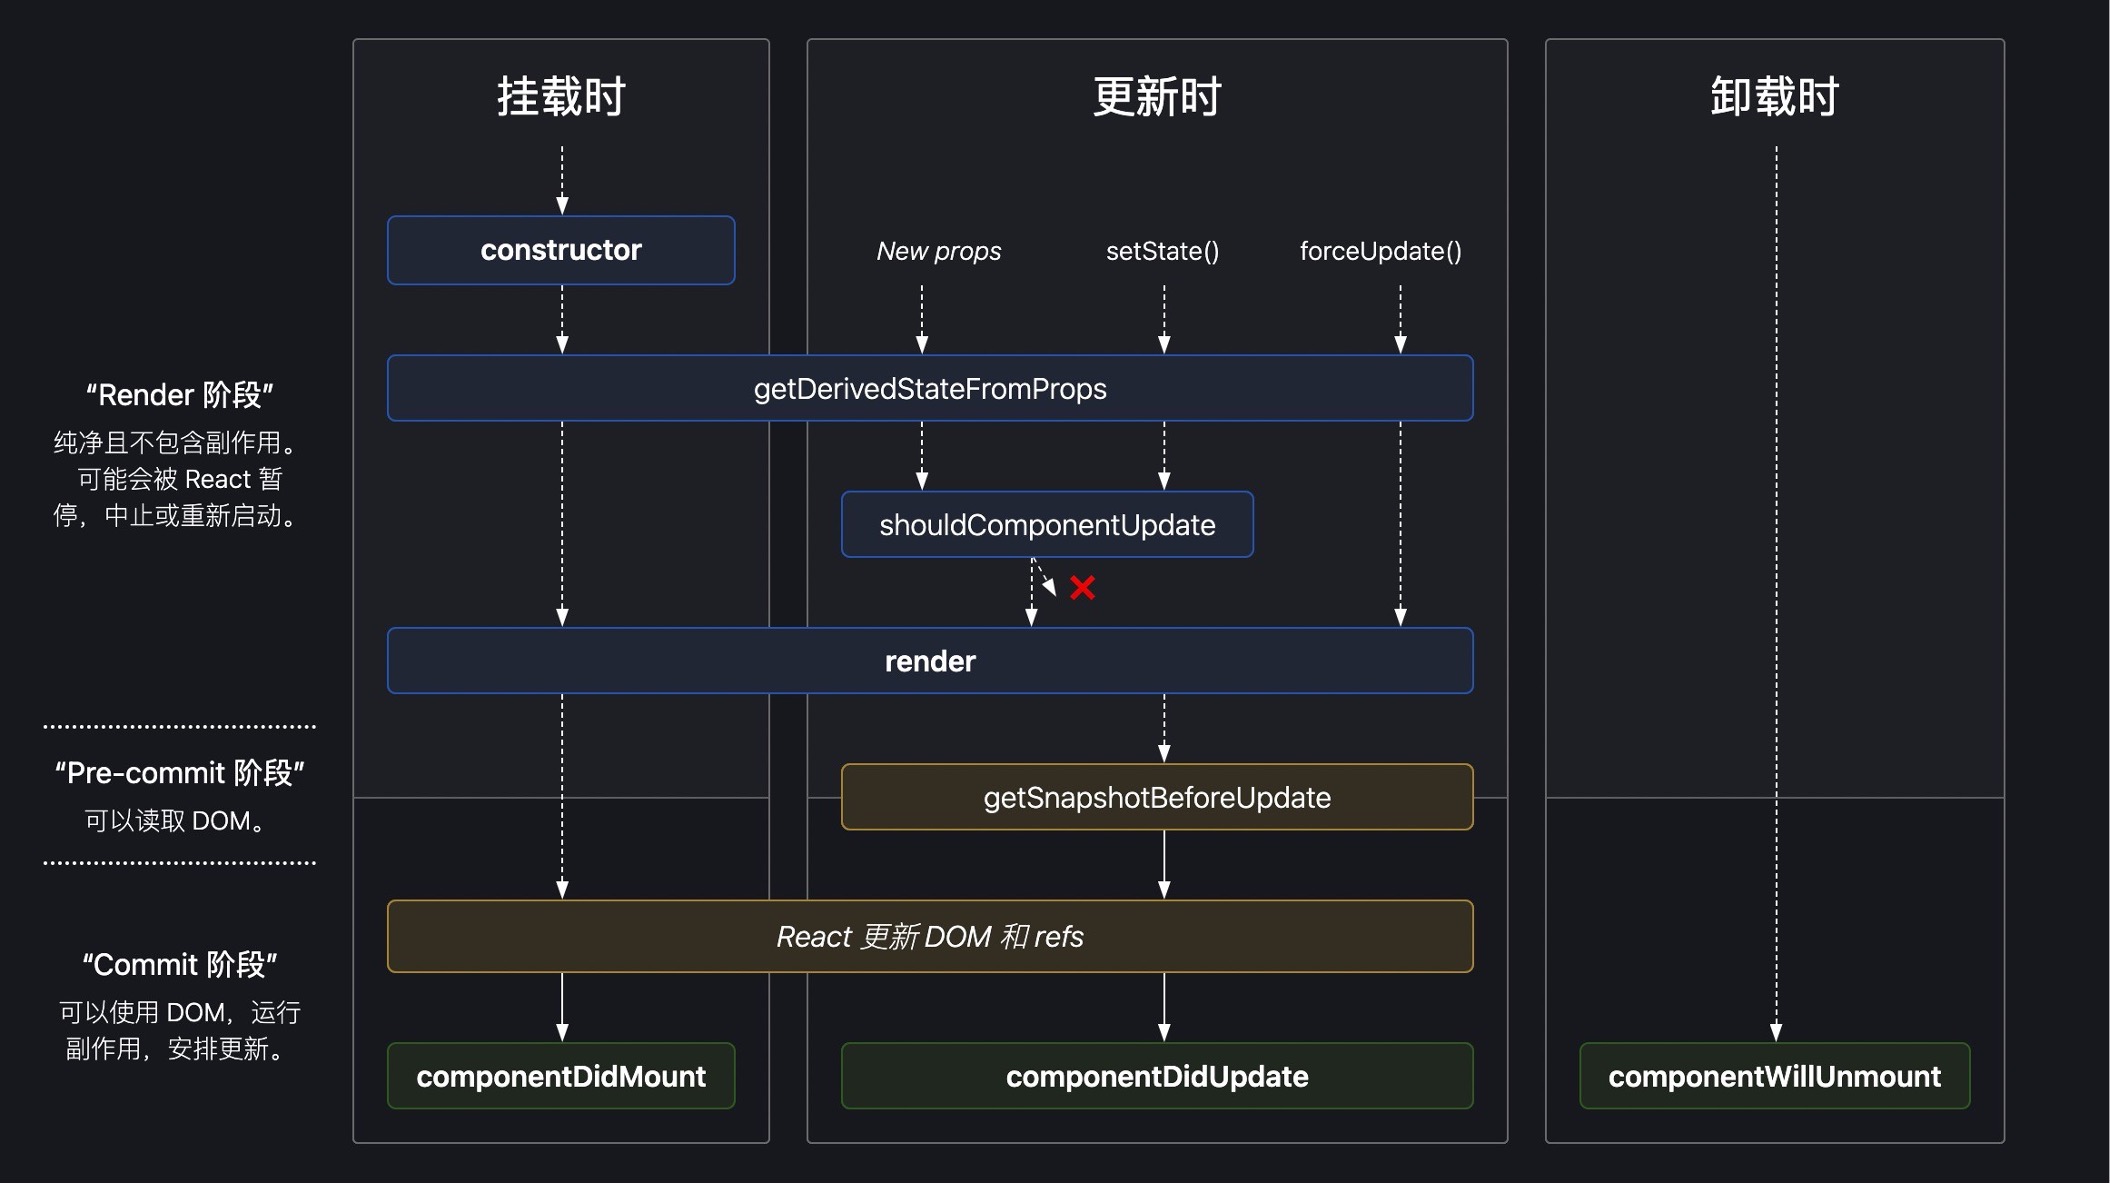
生命周期 React 的 Class 组件有一系列生命周期方法,按阶段分为:挂载、更新、卸载。
常用的几个 :
render:Class 组件唯一必须的方法。应该是纯函数——不修改 state,每次调用返回相同结果constructor:初始化 state 或绑定方法。不要在这里调用 setState,也不要直接把 props 赋值给 statecomponentDidMount:组件挂载后立即调用。适合做 DOM 初始化、网络请求、订阅。可以在这里调用 setState,但会触发额外渲染componentDidUpdate(prevProps, prevState):更新后调用。常用于比较 props 变化后执行副作用。务必加条件判断 ,否则死循环:
1 2 3 4 5 componentDidUpdate (prevProps ) { if (this .props .userID !== prevProps.userID ) { this .fetchData (this .props .userID ); } }
componentWillUnmount:组件卸载前调用。清除 timer、取消网络请求、取消订阅。不要在这里调用 setState
不常用的 :
shouldComponentUpdate(nextProps, nextState):性能优化,返回 false 跳过渲染getDerivedStateFromProps(props, state):根据 props 变化同步更新 state(少用,通常有更好的方案)getSnapshotBeforeUpdate:在 DOM 更新前捕获信息(如滚动位置)getDerivedStateFromError + componentDidCatch:实现错误边界
已废弃的 :UNSAFE_componentWillMount、UNSAFE_componentWillReceiveProps、UNSAFE_componentWillUpdate——不要在新代码中使用。
事件处理 React 事件命名的几个规则:
使用 camelCase(onClick 而不是 onclick)
传入函数而不是字符串
阻止默认行为必须调用 preventDefault(),不能通过 return false
Class 组件中要注意 this 绑定。下面的代码中,如果不绑定 this,handleClick 里的 this 会是 undefined:
1 2 3 4 5 6 7 8 9 10 11 12 function ActionLink ( function handleClick (e ) { e.preventDefault (); console .log ('The link was clicked.' ); } return ( <a href ="#" onClick ={handleClick} > Click me </a > ); }
1 2 3 4 5 6 7 8 9 10 11 12 13 14 15 16 17 18 19 20 21 22 23 24 25 26 27 28 29 30 class Toggle extends React.Component { constructor (props ) { super (props); this .state = {isToggleOn : true }; this .handleClick = this .handleClick .bind (this ); } handleClick ( this .setState (state => isToggleOn : !state.isToggleOn })); } render ( return ( <button onClick ={this.handleClick} > {this.state.isToggleOn ? 'ON' : 'OFF'} </button > ); } } ReactDOM .render ( <Toggle /> document .getElementById ('root' ) );
为什么要绑定 this? React 的 JSX 事件处理本质上等价于 domObj.onclick = params.onclick——函数被赋值给了 DOM 元素,this 丢失了原来的上下文。
三种绑定方式 :
constructor 中 bind(推荐,只绑定一次)
箭头函数 class property(实验性语法,但 create-react-app 默认支持)
箭头函数包裹(不推荐,每次 render 创建新函数,可能导致子组件不必要的重渲染)
接收参数
事件对象 e 会被作为第⼆个参数传递;
通过箭头函数的⽅式,事件对象必须显式的进⾏传递;
通过 Function.prototype.bind 的⽅式,事件对象以及更多的参数将会被隐式的进⾏传递;
1 2 <button onClick={(e ) => this .deleteRow (id, e)}>Delete Row </button> <button onClick ={this.deleteRow.bind(this, id )}> Delete Row</button >
条件渲染与列表 条件渲染的四种方式
if/else :在 render 方法中使用 JS 条件判断,返回不同的 JSX三元运算符 :{isLoggedIn ? <LogoutButton /> : <LoginButton />}&& 运算符 :{unreadMessages.length > 0 && <h2>...</h2>}。注意:左侧为 0 时会渲染出 0,因为 0 是 falsy 但不是 React 会跳过的值返回 null :组件返回 null 则什么都不渲染
列表与 Key 渲染列表时必须给每一项指定 key。key 帮助 React 在 diff 时识别哪些元素变化了:
1 2 3 4 5 6 7 8 9 10 11 12 13 14 15 16 17 function NumberList (props ) { const numbers = props.numbers ; const listItems = numbers.map ((number ) => <li key ={number.toString()} > {number} </li > ); return ( <ul > {listItems}</ul > ); } const numbers = [1 , 2 , 3 , 4 , 5 ];ReactDOM .render ( <NumberList numbers ={numbers} /> document .getElementById ('root' ) );
若没有 key,会 warning a key should be provided for list items;
Key 的三个注意点 :
key 要放在 map() 最外层的元素上,不要放在被遍历组件内部
key 只需要在兄弟节点之间唯一,全局不需要唯一
不要用 index 作为 key(除非列表是静态的、不会重新排序的)。用 index 会导致错误的复用,在列表项增删移动时出 bug
深入理解 React 如何防御 XSS React DOM 在渲染所有输入内容之前,默认会进行转义。所以直接写 {userInput} 是安全的:
1 2 const title = response.potentiallyMaliciousInput ; const element = <h1 > {title}</h1 >
源码中的转义逻辑对 <、>、"、'、& 做了处理,防止注入 HTML。
setState 的”异步”真相 setState 的异步不是真正的异步——它本身是同步执行的,但 React 出于性能优化,在合成事件和生命周期中对多个 setState 做了批量处理 。
具体表现:
合成事件和生命周期中 :setState 是”异步”的,连续多次调用会被合并,只能拿到更新前的值。但可以用 setState(partialState, callback) 中的 callback 获取更新后的结果原生事件和 setTimeout 中 :setState 是同步的,不会批量更新多次 setState 同一值 :后面的覆盖前面的多次 setState 不同值 :合并后批量更新
这是 React 18 以前的行为。React 18 的 Automatic Batching 让所有更新都默认批量处理(包括 setTimeout 和原生事件)。